Oh! Toodles!
We had an absolutely wonderful time celebrating Sarah's 4th Birthday this past weekend! Well over 20 guests came to celebrate with u.s (That's quite a crowd when you add in our own family of nine!)
When planning the party, I knew I didn't want the pink & purple Minnie Mouse products that were currently available. I originally envisioned a vintage style party with red, white and black. But vintage Minnie often wore a blue skirt. And I feared I would have a hard time find items that I wanted to pull it all together. I ended up opting for a more modern Minnie Mouse and went with a color scheme of red, yellow, black and white.
The Invitation
The Party Table
I just loved this
Minnie Mouse poster I happened upon when searching for party items. It made the perfect centerpiece for our party table.
I created the banner by making ear templates and cutting them out on black cardstock. I printed the letters using the free
Waltograph font. I printed them on white cardstock and cut circles around them. I couldn't find my hot glue gun when making these, so I sewed on little polka dot bows to each set of ears.
All of the kids were given a pair of Minnie or Mickey ears to wear for the party. I found a 36 pack of black headbands on Amazon.com. I made bows from polka dot ribbon and cut ears out of cardstock and hot glued them to the headbands. Super easy, with great results!
I found a great selection of lanterns, fans and such at Oriental Trading Company. The colors matched our party items perfectly. I used 3yellow table covers to create the skirt on the table. I left it folded in half lengthwise and gathered and taped it to the table with packaging tape. I used another yellow table cover for the top and a piece of black fabric.
Now onto some of the details:
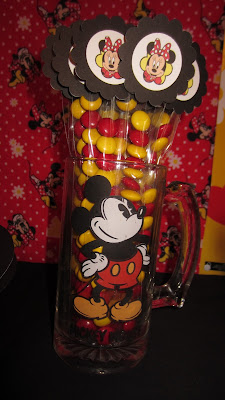
Red and yellow m&m's in
sleeves from Stampin' Up
The little tags at the top were made from a sheet of images you can get
here. I used a 1 1/4" circle punch for the Minnie images and a 2" scalloped circle punch for the black cardstock background.
Red, white and yellow Sixlets candies
Minnie Mouse doll from our trip to Walt Disney World last year
Forks aka. Handy Helpers
Cherry Chip and Chocolate Cupcakes with an Oreo buttercream frosting
Powdered donuts in polka dot cupcake liners
More Sixlets candies
Minnie Mouse Oreos
These were made with double stuff and mini Oreos. I 'glued' the pieces together with melted chocolate chips. The bow were made from
heart shaped sprinkles. I used some melted white chocolate chips for the dots ont he bows.
The Cake!
The 'hat' top layer was Cherry Chip Cake.
Games
Our first game was Disney Bingo. We had kids ranging in age from 3-14 playing, and they all enjoyed playing!! We used little licorice pieces for card markers. The kids got to eat their game pieces at the end of the game, so everyone was a winner!
The second game was "Pin the Minnie Mouse Ears on Sarah". Did you know you can get engineer prints made at Staples for just a couple dollars??? So cool!
The kids loved the twist on this party favorite!
The Kids' Party Table
Building this table is probably on of our greatest ideas ever! We built it from a half-width piece of MDF board with 6 2x4 legs. It is the perfect height for kids. The seats are paint buckets. Do the polka dot seat covers look familiar? You may have seen them
here!
Each of the kids had a coloring page and little crayon roll-up they could take home with them at the end of the party. These were super easy to sew. I started with this basic pattern idea from
Pleated Poppy. I didn't quite stick to the size dimensions. Each of my fabric pieces were approx. 5" tall by 10" wide (the width of the fabric folded in fourths) before sewing. I then sewed each of the crayon pouches 1" apart. Instead of using rubber bands and buttons, I used Velcro. I figured this would be easier for little hands to fasten.
The Photo Booth
The kids (teens & adults) had a lot of fun with this!
Presents!
(our Photo Booth area was the perfect place for opening photos)
There you go! My sweet Sarah is FOUR!


